Autor: Daniel Davila Lopez

Daniel Davila Lopez

Antivirus, Sophos Xploit Prevention

PROCEDIMIENTO PARA LA INSTALACIÓN DEL MÓDULO DE SOPHOS XPLOIT PREVENTION

Si se tiene instalado el Antivirus SOPHOS en los Programas y Características de Windows, se mostrarán de esta manera:


Download Manual PDF

Esta instalación funciona tanto para si contamos con el SOPHOS ya instalado, como para una instalación nueva del Antivirus junto con el Parche; se ejecutará como Administrador el archivo de instalación “SophosEndpoint – Remotos_EXPLOIT.exe”

Si se conoce el proceso de ingreso y descarga de archivos del FTP, pasar al PASO 2.

El Archivo de Instalación se encuentra en el FTP; a continuación se explicarán los procesos de descarga tanto por el FTP Público como por el de la Red Privada.


PASO 1. DESCARGA POR FTP PÚBLICO

Ingresamos por medio de un Navegador de Internet a la dirección:

ftp://148.223.57.35


Seguimos la Ruta “Software/Antivirus/Sophos”


Descargamos el archivo “SophosEndpoint – Remotos_EXPLOIT.exe”


PASO 1.2. DESCARGA SOLO USUARIOS EN CORPORATIVO

Ingresamos por medio de FileSystem la dirección:

\\172.16.1.8 o bien \\desseo

Aquí seguimos la Ruta “Software/Antivirus/Sophos”


Copiamos el archivo “SophosEndpoint – Remotos_EXPLOIT.exe” y lo pegamos de manera local a nuestro equipo.


PASO 2. INSTALACIÓN

Una vez descargado o copiado; lo ejecutaremos como administrador para comenzar la instalación.


Una vez ejecutado automáticamente el proceso comenzará a cerrar la aplicación del Sophos si es que se encuentra en ejecución y comenzará a instalarse la característica de xploit prevention.

Como se mencionaba anteriormente si el equipo no contaba con una instalación previa del SOHOS, se comenzarán a descargar e instalar las librerías necesarias para la instalación de la aplicación junto con la característica de XPLOIT.


PASO 3. VERIFICACIÓN DE LA ACTUALIZACIÓN DE PAQUETES

Para poder visualizar el avance de la instalación nos dirigimos al panel de tareas activas en la parte Inferior Derecha y sobre el icono del SOPHOS damos click derecho y seleccionamos “Ver estado de actualización”


Se nos mostrará un cuadro de avance de ocho partes como este (Cuando no se cuenta la característica de Shopos y se está instalando por primera vez, mostrara menor cantidad de paquetes, esto es normal ya que al terminar de instalar los paquete base de 1 al 6 continuara con los paquetes 7 y 8 que son los módulos del XPLOIT):


PASO 4. ULTIMOS PASOS, VERIFICACIÓN DE SERVICIOS

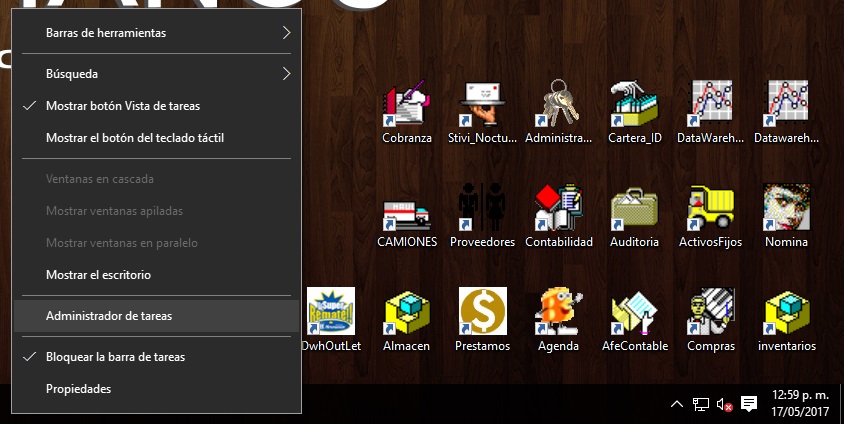
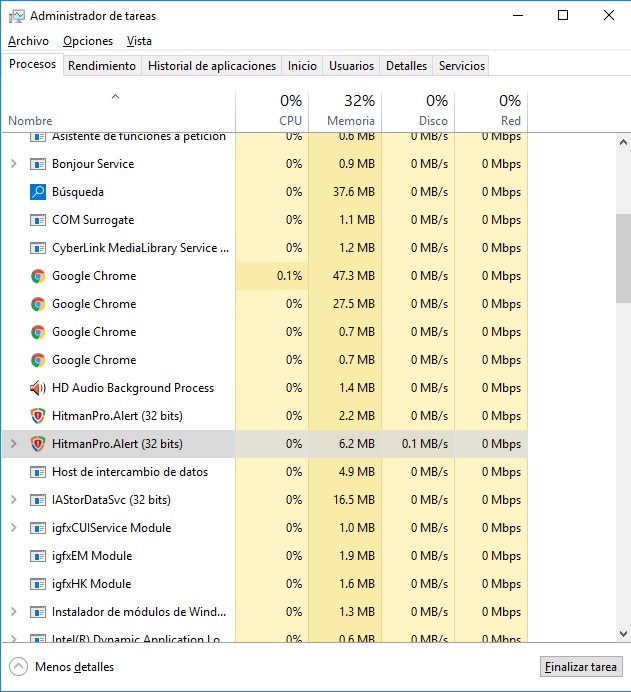
Al finalizar la instalación, se reinicia el equipo para asegurarnos que el servicio del XPLOIT se corra correctamente, en administrador de programas debe estar el proceso HitmanPro.exe


admin


Se agregará un servicio llamado “Hitmanpro.exe”


tareas


También comprobamos que está instalado el modulo en Panel de Control -> Programas y características.


Documento para uso exclusivo de Grupo Batta

Error 0x00000709 al instalar o predeterminar una impresora

Problema:

Al querer instalar un impresora en su PC o bien predeterminarla, se muestra un mensaje de error que indica: Error 0x00000709


Solución:

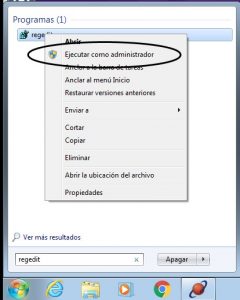
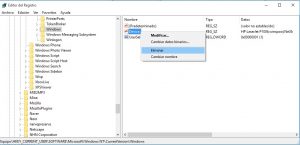
  1.  Ejecute Regedit como administrador
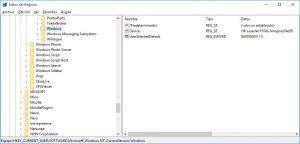
  2. Selecione la clave HKEY_CURRENT_USER\SOFTWARE\Microsoft\Windows NT\CurrentVersion\Windows
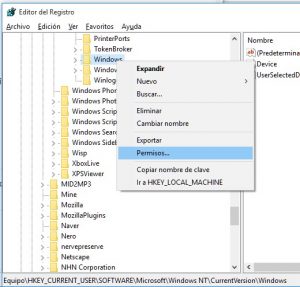
  3. Presione botón derecho sobre la clave Windows y seleccione Permisos
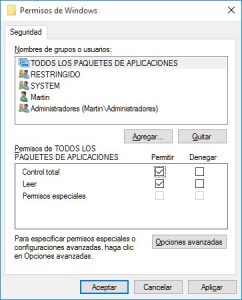
  4. Seleccione el grupo «Todos los paquetes de aplicaciones», marque Permitir en la columna de «Control Total» y haga clic sobre Aceptar
    NOTA: Si no encuentra «Todos los paquetes de aplicaciones», seleccione su usuario de Windows
  5. Seleccione el valor Device, haga clic derecho, Eliminar
  6. Reinicie Windows


VMware, Update Firmware Ilo(2,3,4) y Firmware Host BL460c G7

Procedimiento para actualizar los firmwares de ILo3 y del host BL460c, sera un procedimiento muy especifico, que servira como guia para cualquier cosa que se quiera hacer acerca de update firmwares de otro tipo.

Para comenzar hay que precisar que estamos trabajando sobre un Enclosure HP C7000 y host Blades ProLiant BL460c G7. Tambien comentar que este procedimiento ha sido probado en 6 hosts de una infraestructura de VMware ver 6.0.0

Lo primero que hay que ver es la versión ILo y de host que tenemos

(IMAGENES)


Migraremos  el Firmware de la ILo, de la versión «1.16 Dic 17 2010» a la versión «1.26 Aug 26 2011».

Nota:  nuestra meta es migrar a la versión «1.88 Jul 13 2016», pero no se puede de manera directa, por lo que hay que hacer una escala por la versión 1.26.

Firmware Ilo

(imagenes)


Proseguimos con el update del firmware del host, para esta operacion utilizaremos un ISO que contiene los ultimos parches

«HP SPP 2016 Octubre.iso»

El cual lo tenemos preparado para montarlo a través de la conexión ILo del esx u Host.


Firmware Ilo4 Blade 460c Gen8

Here are the steps that I used to complete the process:

1. Boot up the server.  In this picture I am working with a BL460 Gen8 (half height blade server).  On the newly designed Gen8 boot up screen up will see the option to hit F10 for access to the “Intelligent Provisioning (IP)” management console.  Once you hit F10 the label will light up.

image

2.  Now, the IP has begun to load up.

image

3.  Once everything is loaded a screen will come up with two options.  To move forward click on “Perform Maintenance”

image

4.  In the next window go ahead and click “Firmware Update”.

image

5.  The Firmware Update smart tool will now use the internet to reach out to HP and determine the available updates for your machine.  You can click on the update to get more information on the fixes.  Once you are ready, select the updates you wish to install.  Once you hit “install” a warning windows will appear letting you know that you cannot cancel this procedure once you hit continue.

image

image

image

6.  We have progress!  You can see updates being checked off as they are remediated.  Just as a heads up some updates will cause the ILO connection to be reset.  HP did a good job on letting you know a few seconds before this happens.

image

7.  Once all updates complete the HP update manager will perform a check on all components to make sure everything is healthy.

image

8.  Once the internal health checks are completed you need to go ahead and restart the server to complete the process.  The reboot doesn’t seem to take any longer than a standard one so this just seems to update the software version, etc.

image


Fuente: «http://3cvguy.com/updating-your-hp-proliant-gen8-firmware-with-smart-update-manager/»

Active Health System

Use HP iLO to download the Active Health System Log for a date range

Use HP iLO to download the Active Health System Log for a date range

To download the Active Health System log using HP iLO:

  1. Navigate to the Information > Active Health System log page.
  2. Enter the range of days to include in the log.

    The default setting is to include log information for the last seven days. Click Reset range to default values to reset the dates.

    1. Click the From box.

      A calendar is displayed.

    2. Select the range start date on the calendar.
    3. Click the To box.

      A calendar is displayed.

    4. Select the range end date on the calendar.
  3. Enter the contact information to include in the downloaded file (optional):
    • HP Support case number
    • Contact name
    • Phone number
    • Email
    • Company name
  4. Click Download.

    A dialog box prompts you to open or save the file.

  5. Click Save.

    A dialog box prompts you to choose a file location.

  6. Specify a file location and file name, and then click Save.
  7. If you have an open case with HP Support, you can e-mail the log file to HPsupport_Global@hp.com.

    Use the following convention for the email subject:

    <CASE:XXXXXXXXXX>, where XXXXXXXXXX represents your HP Support case number.

Active Health System logs larger than